Components overview
Components are the building blocks of your flows. Like classes in an application, each component is designed for a specific use case or integration.
SkillFlaw provides keyboard shortcuts for the workspace.
In the SkillFlaw header, click your profile icon, select Settings, and then click Shortcuts to view the available shortcuts.
Add a component to a flow
To add a component to a flow, drag the component from the Flow components or Business components menu into the workspace.
Components are grouped by type or provider, and some components are hidden by default:
-
Flow components: SkillFlaw's base workflow components are grouped by purpose, such as Inputs and Outputs or Data. These components either provide generic functionality, like loops and parsing, or they provide single components that support multiple third-party integrations.
-
Business components: Business components are grouped by service provider and contain one or more components for specific business integrations.
-
Legacy: These components are hidden by default. For more information, see Legacy components.
Configure a component
After adding a component to a flow, configure the component's parameters and connect it to the other components in your flows.
Each component has inputs, outputs, parameters, and controls related to the component's purpose. By default, components show only required and common options. To access additional settings and controls, including meta settings, use the component's header menu.
Component header menus
To access a component's header menu, click the component in your workspace.
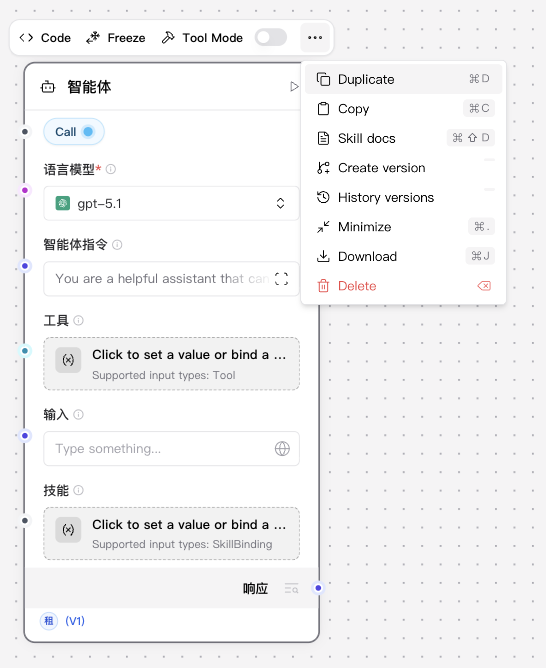
The current header menu puts the most common actions directly above the selected component:
- Code: Open the component development window and edit the component's Python implementation.
- Freeze: Freeze the current component and its upstream results.
- Tool Mode: Enable the component when it needs to be used as a tool by an Agent component.
The overflow menu extends this workflow with component-specific actions such as:
- Skill docs
- Create version
- History versions
- Minimize
- Download
- Delete
These actions are organized around the current component lifecycle: develop the node, keep its skill document in sync, and manage node-level versions without leaving the workspace.
Skill docs
The Skill docs entry opens the Skill document preview associated with the current component, so you can inspect the generated SKILL.md without leaving the current workflow editing context.
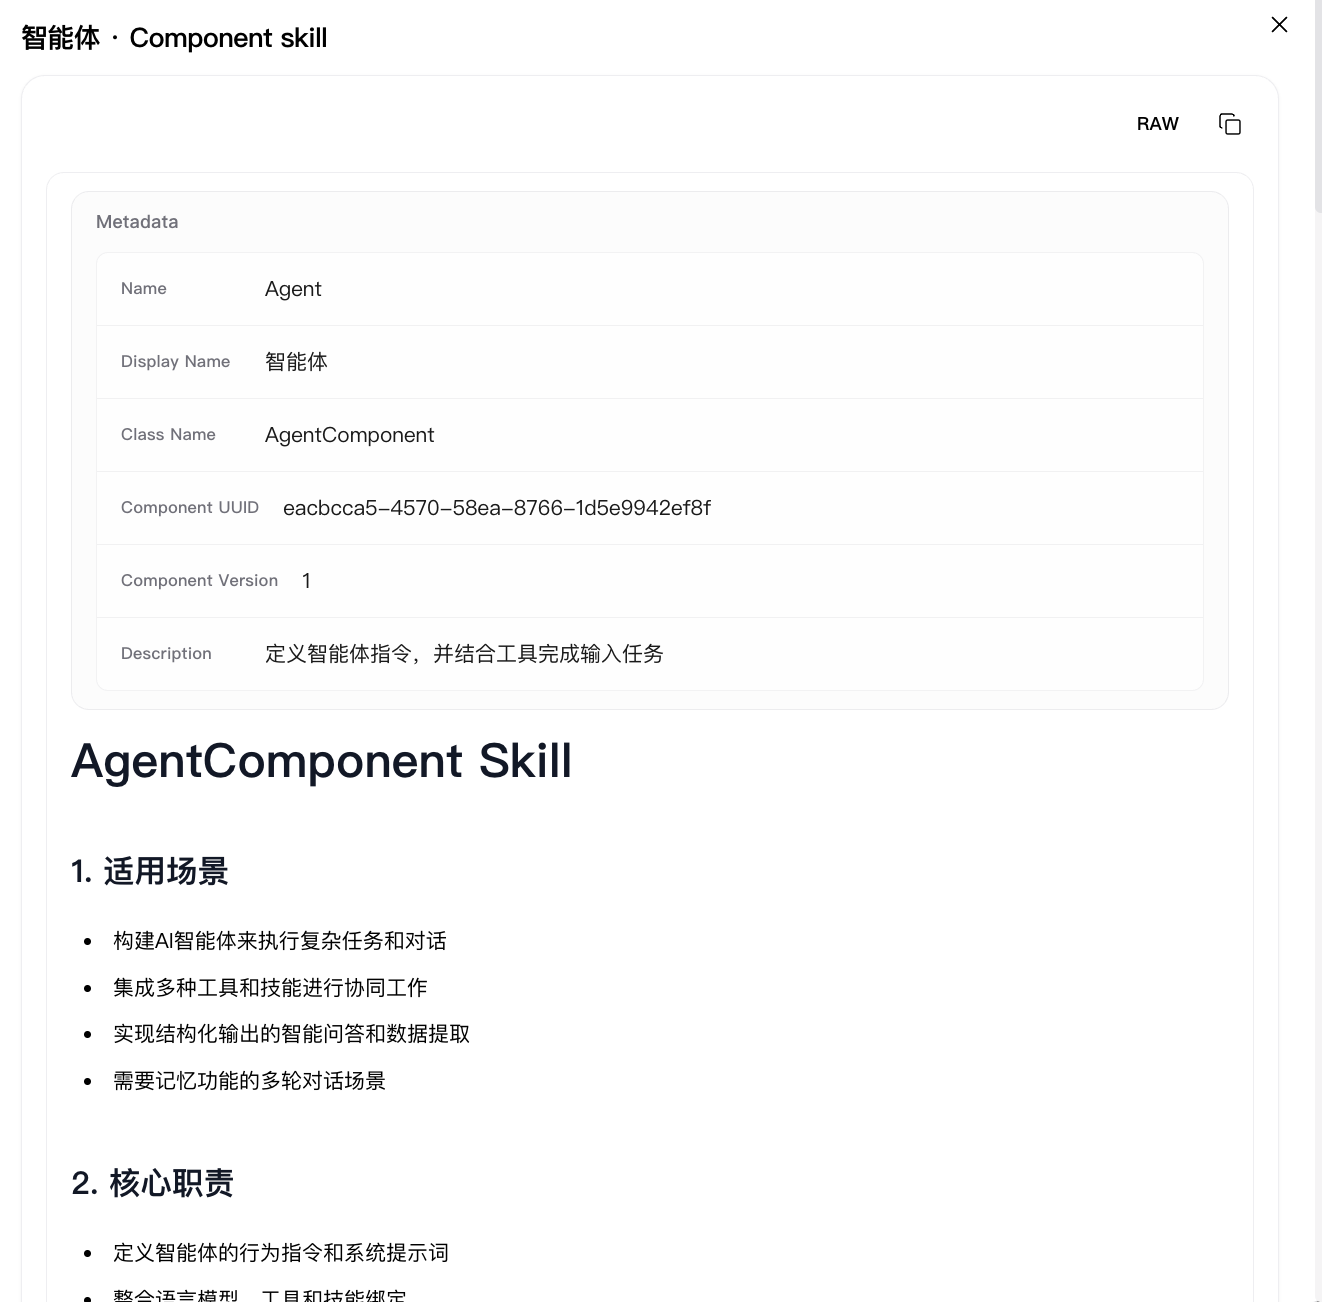
The preview dialog is read-only and focuses on the generated component skill content itself. It typically shows:
- the rendered
SKILL.mdcontent - the corresponding raw markdown view
- frontmatter summary fields such as component display name, class name, UUID, version, and description
- quick copy / preview actions for reviewing the generated skill content
When you use Create version from the component menu, SkillFlaw not only saves the current node as a new component version, but also generates the component's Skill document at the same time. In practice, version records and skill documentation are created together.
Rename a component
To modify a component's name or description, click the component in the workspace, and then click Edit. Component descriptions accept Markdown syntax.
Run a component
To run a single component, click Run component. A Last Run value indicates that the component ran successfully.
Running a single component is different from running an entire flow. In a single component run, the build_vertex function is called, which builds and runs only the single component with direct inputs provided through the visual editor (the inputs_dict parameter). The VertexBuildResult data is passed to the build_and_run method that calls the component's build method and runs it. Unlike running an entire flow, running a single component doesn't automatically execute its upstream dependencies.
Inspect component output and logs
To view the output and logs for a single component, click Inspect.
Freeze a component
Freezing a component also freezes all components upstream of the selected component.
Use the freeze option if you expect consistent output from a component and all upstream components, and you only need to run those components once.
Freezing a component prevents that component and all upstream components from re-running, and it preserves the last output state for those components. Any future flow runs use the preserved output.
To freeze a component, click the component in the workspace to expose the component's header menu, click Show More, and then select Freeze.
Component ports
Around the border of each component, there are circular port icons like . These indicate a component connection point or port.
Ports either accept input or produce output of a specific data type. You can infer the data type from the field the port is attached to or from the port's color. For example, the System Message field accepts message data, as illustrated by the blue port icon: .

When building flows, connect output ports to input ports of the same type (color) to transfer that type of data between two components. For information about the programmatic representation of each data type, see SkillFlaw data types.
-
In the workspace, hover over a port to see connection details for that port. Click a port to Search for compatible components.
-
If two components have incompatible data types, you can use a processing component like the Type Convert component to convert the data between components.
Input and Output definitions
In SkillFlaw, inputs and outputs define how a component receives configuration or upstream data, and how it exposes results to downstream components.
- Input: An entry point where a component receives data or configuration. An input can appear as a parameter field, a connectable input port, or both.
- Output: An exit point where a component publishes results. Outputs determine what downstream components can consume and what the reference picker can expose.
An input definition commonly includes:
name: stable field name used in saved configuration and referencesdisplay_name: UI labeltype/field_type: editor field type or value typerequired: whether the input is mandatoryinput_types: allowed data types when the input can accept port connectionsis_list: whether the input accepts multiple values
An output definition commonly includes:
name: stable output name used by ports and referencesdisplay_name: UI labelmethod: method name that produces the outputtypesandselected: supported output data types and the currently selected typegroup_outputs: whether multiple outputs are exposed simultaneouslyoutput_fields: structured fields that can be referenced stably
In short, inputs define how a component receives values, while outputs define how a component exposes results as a reusable contract.
Input types and Output types
SkillFlaw uses two layers of type definitions:
- Port data types: determine whether ports can connect, what color a port uses, and what runtime value shape is passed between components.
- Input field types: determine how component parameters are edited, validated, and stored in the UI.
Port data types
Input ports and output ports share the same data type system. The main stable port data types documented in the product are:
DataDataFrameEmbeddingsLanguageModelMemoryMessageTool- unknown or multiple types
For the meaning and structure of each type, see SkillFlaw data types.
Input field types
Component parameters are not always ports. SkillFlaw also defines a set of input field types that describe editing behavior, validation rules, and optional binding behavior. Not every input field type is rendered as a connectable port; many exist purely for parameter editing and persistence.
For readability, these types can be understood as two broad groups: inputs that can receive upstream values or explicitly declare connectable inputs, and inputs that are mainly used for parameter editing and persisted configuration.
Inputs that can receive upstream values
| Type identifier | Primary use |
|---|---|
HandleInput | Generic handle-based input base type used to declare connectable typed inputs |
DataInput | Accept upstream Data values |
DataFrameInput | Accept upstream DataFrame values |
ModelInput | Select a model or connect upstream LanguageModel / Embeddings outputs |
MessageInput | Accept a full Message object or values that can be normalized into Message |
MessageTextInput | Accept message text values, commonly for text-oriented inputs |
PromptInput | Standard prompt field; in supported binding scenarios it can also receive upstream values |
MustachePromptInput | Prompt field that supports inserting references |
TableInput | Enter tabular data, field lists, schema rows, or other multi-row structured configuration |
ToolsInput | Enter a set of tools for agent and tool orchestration scenarios |
Parameter-editing input types
| Type identifier | Primary use |
|---|---|
StrInput | Single-line text input |
MultilineInput | Multi-line text input |
MultilineSecretInput | Multi-line secret input |
SecretStrInput | Single-line secret or key input |
CodeInput | Enter code snippets or scripts |
IntInput | Integer input |
FloatInput | Floating-point input |
BoolInput | Boolean toggle input |
SliderInput | Slider-based numeric input |
DictInput | Enter dictionary or JSON-like objects |
NestedDictInput | Enter nested object structures |
DropdownInput | Select a value from predefined options |
MultiselectInput | Multi-select input |
SortableListInput | Enter an ordered list that can be rearranged |
TabInput | Tab-based selection input |
ConnectionInput | Enter connection information such as connection strings or related config |
AuthInput | Enter authentication data |
QueryInput | Enter query or search expressions |
FileInput | File resource input |
McpInput | MCP resource or configuration input |
OpenAPIPluginInput | OpenAPI plugin selector input |
SkillInput | Skill resource selector input |
LinkInput | Link input |
DefaultPromptField | Internal default field definition used for default prompt scenarios |
These field types determine how the parameter panel behaves. For example:
DropdownInputis used for predefined selectionsFileInputis used for file-like resourcesTableInputis used for structured tabular configurationMustachePromptInputis used for prompt fields that support inserting referencesDataInput,MessageInput, andModelInputcan receive compatible upstream values through ports in addition to direct parameter values
Output contract and output_fields
Like inputs, outputs are part of a component's public contract. An output defines not only what a component produces, but also how that result is exposed to downstream components, reference pickers, tool mode, and loop-aware behavior.
At the structure level, the key output definition fields include:
| Field | Purpose |
|---|---|
name | Stable output identifier used by ports, output switching, and reference paths |
display_name | UI label |
method | Method name that produces the output |
types | List of supported output data types |
selected | Currently selected output type |
group_outputs | Whether multiple outputs are exposed simultaneously as separate ports |
required_inputs | Inputs that must be available before producing this output |
allows_loop | Whether this output participates in loop semantics |
loop_types | Additional types allowed when loop semantics are enabled |
tool_mode | Whether this output can be used in tool mode |
output_fields | Stable field definitions exposed from the output payload |
options | Additional output options such as filtering |
From a usage perspective, outputs commonly fall into the following patterns:
| Output exposure pattern | Typical characteristic | Common use |
|---|---|---|
| Single output, single type | One output port with one stable result type | Standard component outputs |
| Single output, switchable type | One output name with types and selected | Components that let users switch result shape |
| Multiple outputs exposed together | group_outputs = true, multiple output ports shown at once | Components that need to publish multiple independent results |
| Whole-object output | Only the full result object is exposed, without stable field expansion | Complex objects whose internal fields are not intended as public contract |
| Field-level output contract | Stable fields declared through output_fields | Downstream consumers need precise field-level references |
This means an output is not just a return-value description. It is a unified contract that also drives frontend port rendering, downstream connections, variable references, and parts of runtime behavior.
Output type selection and group_outputs
When a component supports multiple output results, SkillFlaw typically exposes them in two ways:
- Type switching: one output slot supports multiple result types, controlled by
typesandselected - Parallel outputs: multiple outputs are shown on the node at the same time, usually with
group_outputs = true
The first emphasizes one exit with multiple possible result shapes. The second emphasizes one component publishing multiple independent results simultaneously.
output_fields and field-level outputs
An output does more than declare its data type. It can also declare which fields inside the output are stable enough to be referenced individually. This structured contract is represented by output_fields.
Each output_fields item typically includes:
name: field nametype: field typedescription: field descriptionrequired: whether the field is requiredexample: sample value
When a component exposes a stable output structure, SkillFlaw synchronizes these field definitions into the frontend node metadata. This lets the reference picker expose both the whole output and individual fields.
For example, the picker can insert:
- full output:
{{node.<node_id>.output.<output_name>}} - output field:
{{node.<node_id>.output.<output_name>.<field_name>}}
When output_fields is needed
output_fields is appropriate when the output structure is stable, semantically meaningful, and intended for field-level downstream reuse, such as:
- message-like outputs exposing stable fields such as
text - structured extraction results exposing business fields
- Data or DataFrame outputs with explicitly defined field contracts
If a component returns a complex object whose internal attributes are not stable enough to be treated as a public contract, SkillFlaw can expose only the whole object instead of expanding internal fields.
output schema in the Structured Output component
The Structured Output component is the canonical example of an output schema. It uses a table to define the structure of the result, with one row per field. The core columns are:
namedescriptiontypemultiple
In this schema:
typedefines the base field type, such asstring,number,boolean,object, orarraymultiple = truemeans the field is an array value
When you update that schema, the component updates the corresponding output_fields metadata. As a result, downstream components, the reference picker, and output inspection stay aligned with the current schema.
Referencing input values
Inputs that support references can insert upstream node values, system variables, workflow parameters, and shared variables. References use Mustache syntax:
{{reference.path}}
The following reference sources are commonly used in SkillFlaw.
Component input references
Use this form to reference an input field from another node:
- syntax:
{{node.<node_id>.input.<field_name>}} - example:
{{node.prompt-1.input.template}}
This is useful when multiple nodes should reuse the same configured value.
Component output references
Use this form to reference a node output or a field inside that output:
- full output:
{{node.<node_id>.output.<output_name>}} - output field:
{{node.<node_id>.output.<output_name>.<field_name>}} - example:
{{node.chat-input-1.output.text}}
Field-level references are available only when the output declares output_fields.
Workflow parameter references
Workflow parameters belong to the current workflow and are referenced with workflow.<name>:
- syntax:
{{workflow.<name>}} - example:
{{workflow.api_key}}
These values are typically used for workflow-level input contracts, templated configuration, and reusable runtime parameters.
System variable references
System variables are provided by runtime context and can be used directly in prompts and parameter bindings. The stable fields currently exposed are:
flow_idflow_namedescriptionrun_idsession_iduser_iduser_nametenant_idbusiness_idproject_idflow_versiontrigger_sourcenow
Examples include:
{{sys.flow_id}}{{sys.session_id}}{{sys.now}}
Global shared variable references
Shared variables are managed through the variable system and are scoped as system, tenant, business, or personal variables. All of them use the global prefix, and the second segment identifies scope with a scope badge:
系: system scope租: tenant scope业: business scope个: personal scope
The syntax is:
{{global.系.<variable_name>}}{{global.租.<variable_name>}}{{global.业.<variable_name>}}{{global.个.<variable_name>}}
Examples include:
{{global.租.API_KEY}}{{global.业.ENDPOINT_URL}}
In prompt editors and parameter binding dialogs, the reference picker groups these sources as system variables, workflow parameters, shared variables, node inputs, and node outputs.
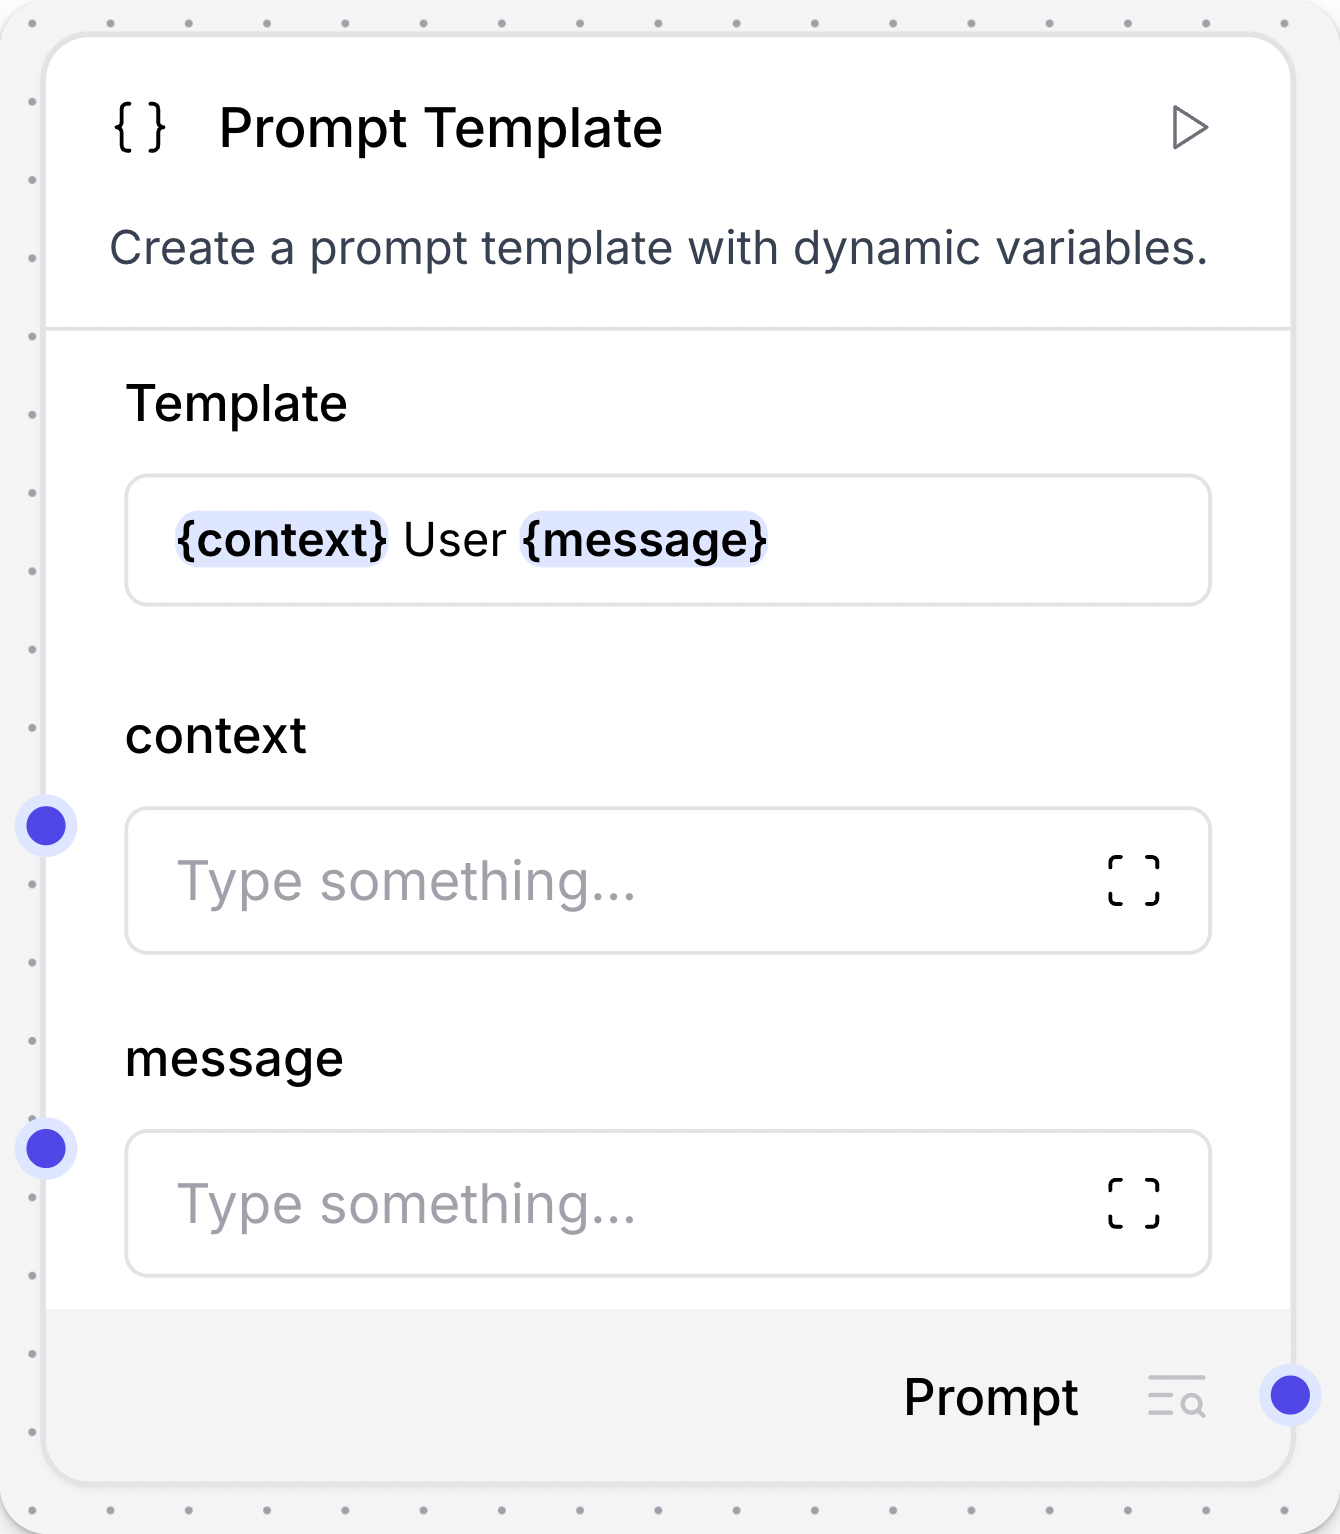
Dynamic ports
Some components have ports that are dynamically added or removed. For example, the Prompt Template component accepts inputs wrapped in curly braces, and new ports are opened when a value wrapped in curly braces is detected in the Template field.
Output type selection
All components produce output that is either sent to another component in the flow or returned as the final flow result.
Some components can produce multiple types of output:
-
If the component emits all types at once, the component has multiple output ports in the visual editor. In component code, this is represented by
group_outputs=True -
If the component emits only one type, you must select the output type by clicking the output label near the output port, and then selecting the desired output type. In component code, this is represented by
group_outputs=Falseor omitting thegroup_outputsparameter.
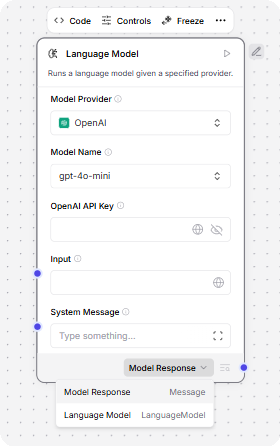
For example, a language model component can output either a Model Response or Language Model.
The Model Response output produces Message data that can be passed to another component's Message port.
The Language Model output must be connected to a component with a Language Model input, such as the Structured Output component, that uses the attached LLM to power the receiving component's reasoning.
Port colors
Component port colors indicate the data type ingested or emitted by the port.
For example, a Message port either accepts or emits Message data.
The following table lists the component data types and their corresponding port colors:
| Data type | Port color | Port icon example |
|---|---|---|
| Data | Red | |
| DataFrame | Pink | |
| Embeddings | Emerald | |
| LanguageModel | Fuchsia | |
| Memory | Orange | |
| Message | Indigo | |
| Tool | Cyan | |
| Unknown or multiple types | Gray |
Component code
You can edit components in the workspace and in code. When editing a flow, select a component, and then click Code to see and edit the component's underlying Python code.
The current development window is titled something like Develop Component: Agent and is split into two panes:
- the left pane is the code editor
- the right pane is AI Component Builder
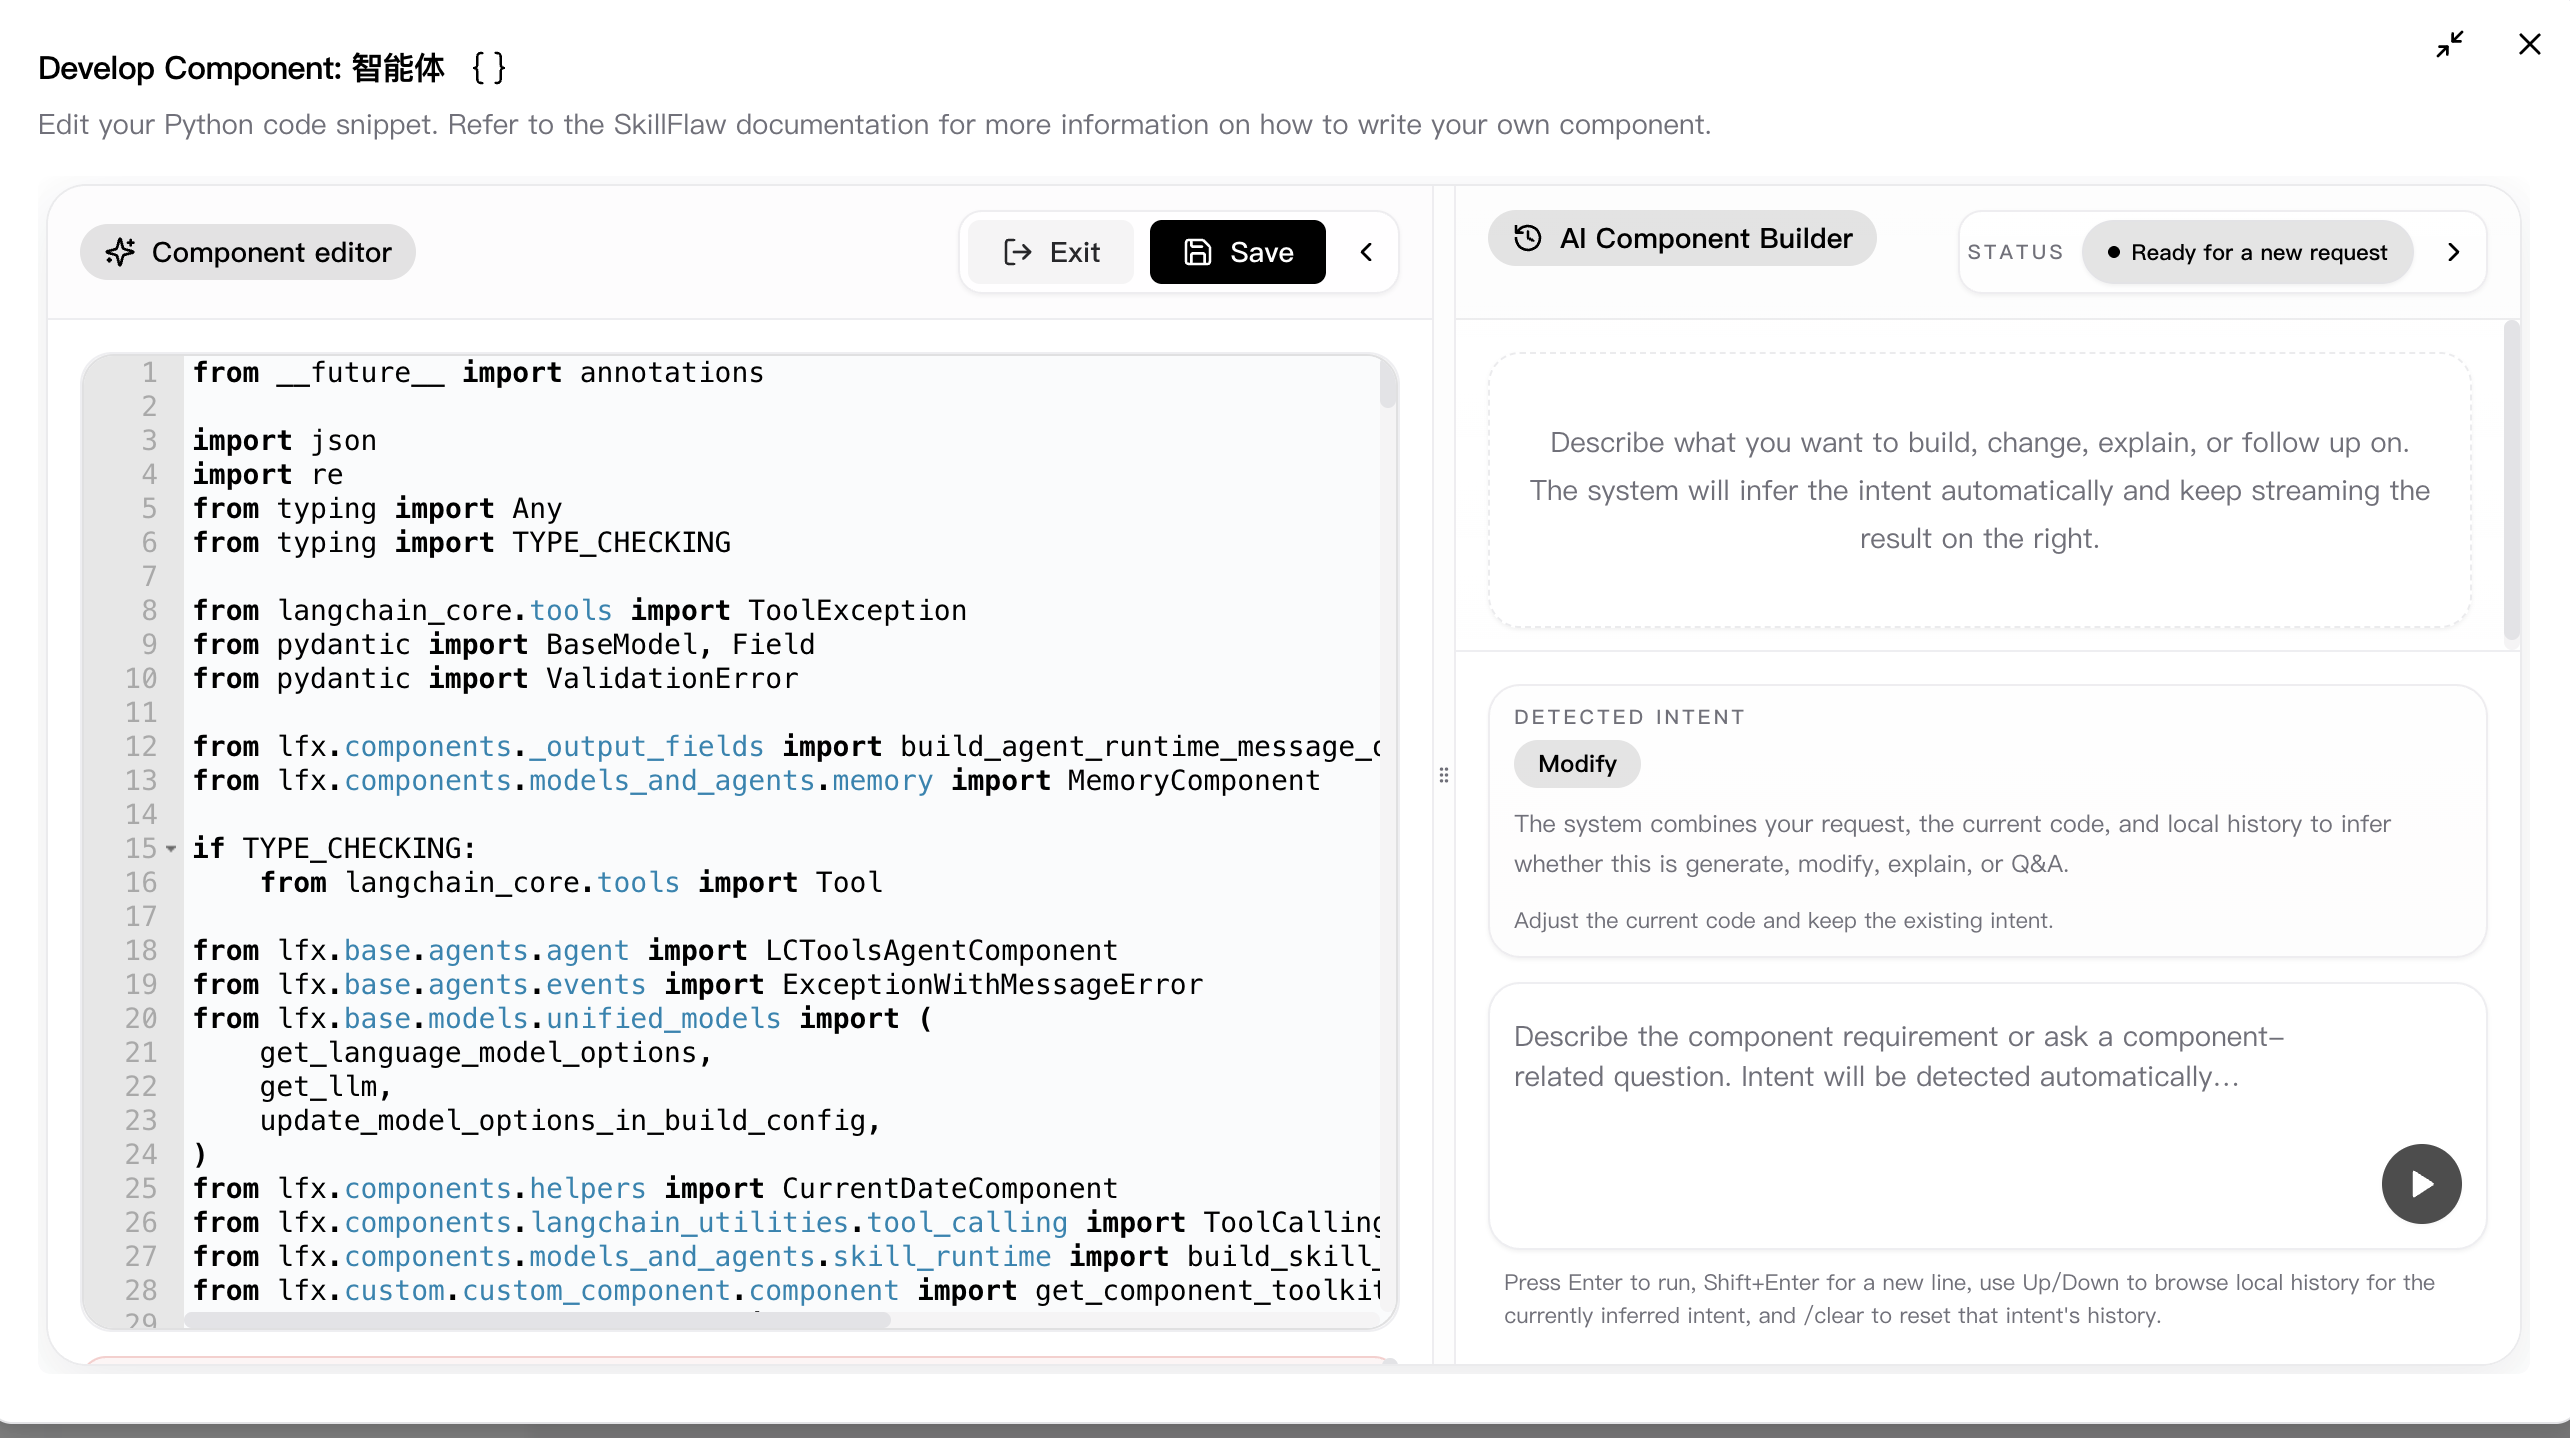
AI coding is built directly into the component editor rather than being a separate page. The AI pane uses your current request, the code already in the editor, and recent local history to infer the most likely intent automatically:
- Generate a new component from requirements
- Modify the current code while preserving its existing intent
- Explain the current component structure and risks
- Q&A for focused follow-up questions about the component
This means you do not have to switch modes manually in normal use. If the editor already contains code and your prompt asks for a fix or adjustment, the request is treated as Modify. If the editor is empty and you describe a new requirement, the request is treated as Generate. Explicit explanation requests and direct questions are routed to Explain and Q&A.
While AI coding is running, the right pane can show:
- the current status
- streamed explanations and final output
- patch previews
- dependency issues
- validation summaries
- smoke check results
- risk notes
The AI panel is designed for iterative development rather than one-shot generation. In the same panel you can:
- type a requirement and press Enter to run it
- use Shift + Enter for a new line
- browse recent local prompt history for the inferred intent
- clear that intent's local history with
/clear
When the result is a code candidate, SkillFlaw shows a status badge, the detected intent, the latest streamed output, and a Patch preview comparing the AI result with the current editor content. If the candidate is blocked, the panel also explains why apply/save is blocked, including missing packages, validation failures, smoke check failures, or patch conflicts.
Once a candidate result is ready, you can review the patch, apply the suggestion back to the editor, and then use Save to persist the final component definition.
The development window also includes practical editing controls such as exit/save actions, collapsible panes, resizable split layout, and fullscreen mode. A common workflow is to enter Code, iterate with AI Component Builder, review the patch, and then save the validated result.
All components have underlying code that determines how you configure them and what actions they can perform. In the context of creating and running flows, component code does the following:
- Determines what configuration options to show in the visual editor.
- Validates inputs based on the component's defined input types.
- Processes data using the configured parameters, methods, and functions.
- Passes results to the next component in the flow.
All components inherit from a base Component class that defines the component's interface and behavior.
For example, the Recursive Character Text Splitter component is a child of the LCTextSplitterComponent class.
Each component's code includes definitions for inputs and outputs, which are represented in the workspace as component ports.
For example, the RecursiveCharacterTextSplitter has four inputs. Each input definition specifies the input type, such as IntInput, as well as the encoded name, display name, description, and other parameters for that specific input.
These values determine the component settings, such as display names and tooltips in the visual editor.
_26 inputs = [_26 IntInput(_26 name="chunk_size",_26 display_name="Chunk Size",_26 info="The maximum length of each chunk.",_26 value=1000,_26 ),_26 IntInput(_26 name="chunk_overlap",_26 display_name="Chunk Overlap",_26 info="The amount of overlap between chunks.",_26 value=200,_26 ),_26 DataInput(_26 name="data_input",_26 display_name="Input",_26 info="The texts to split.",_26 input_types=["Document", "Data"],_26 ),_26 MessageTextInput(_26 name="separators",_26 display_name="Separators",_26 info='The characters to split on.\nIf left empty defaults to ["\\n\\n", "\\n", " ", ""].',_26 is_list=True,_26 ),_26 ]
Additionally, components have methods or functions that handle their functionality.
For example, the RecursiveCharacterTextSplitter has two methods:
_16 def get_data_input(self) -> Any:_16 return self.data_input_16_16 def build_text_splitter(self) -> TextSplitter:_16 if not self.separators:_16 separators: list[str] | None = None_16 else:_16 # check if the separators list has escaped characters_16 # if there are escaped characters, unescape them_16 separators = [unescape_string(x) for x in self.separators]_16_16 return RecursiveCharacterTextSplitter(_16 separators=separators,_16 chunk_size=self.chunk_size,_16 chunk_overlap=self.chunk_overlap,_16 )
The get_data_input method retrieves the text to be split from the component's input, which makes the data available to the class.
The build_text_splitter method creates a RecursiveCharacterTextSplitter object by calling its parent class's build method. Then, the text is split with the created splitter and passed to the next component.
Component versions
Component versions and states are stored in an internal SkillFlaw database. When you add a component to a flow, you create a detached copy of the component based on the information in the SkillFlaw database. These copies are detached from the primary SkillFlaw database, and they don't synchronize with any updates that can occur when you upgrade your SkillFlaw version.
In other words, an individual instance of a component retains the version number and state from the moment you add it to a specific flow. For example, if a component is at version 1.0 when you add it to a flow, it remains at version 1.0 in that flow unless you update it.
In addition to the database-backed component version itself, the flow editor now exposes node-level version actions directly from the selected component:
- Create version: Create a new component version from the current node content.
- History versions: Choose a historical version and replace only the currently selected node.
Using Create version also triggers generation of the component's Skill document. Using History versions lets you roll back the selected node quickly without affecting other nodes in the same flow.
Update component versions
When editing a flow in the workspace, SkillFlaw notifies you if a component's workspace version is behind the database version so you can update the component's workspace version:
-
Update ready: This notification means the component update contains no breaking changes.
-
Update available: This notification means the component update might contain breaking changes.
Breaking changes modify component inputs and outputs, causing the components to be disconnected and break the flow. After updating the component, you might need to edit the component settings or reconnect component ports.
There are two ways to update components:
-
Click Update to update a single component. This is recommended for updates without breaking changes.
-
Click Review to view all available updates and create a snapshot before updating. This is recommended for updates with breaking changes.
To save a snapshot of your flow before updating the components, enable Create backup flow before updating. Backup flows are stored in the same project folder as the original flow with the suffix
(backup).To update specific components, select the components you want to update, and then click Update Components.
Components are updated to the latest available version, based on the version of SkillFlaw you are running.
Group components
Multiple components can be grouped into a single component for reuse. This is useful for organizing large flows by combining related components together, such as a RAG Agent component and it's associated tools or vector store components.
-
Hold Shift, and then click and drag to highlight all components you want to merge. Components must be completely within the selection area to be merged.
Alternatively, to select components for merging one by one, hold Ctrl on Windows or Cmd on Mac, and then click each component to add them to the group.
-
Release the mouse and keyboard, and then click Group to merge the components into a single, group component.
Grouped components are configured and managed as a single component, including the component name, code, and settings.
To ungroup the components, click the component in the workspace to expose the component's header menu, click Show More, and then select Ungroup.
If you want to reuse this grouping in other flows, click the component in the workspace to expose the component's header menu, click Show More, and then select Save to save the component to the Core components menu as a custom component.
Legacy components
Legacy components are longer supported and can be removed in a future release. You can continue to use them in existing flows, but it is recommended that you replace them with supported components as soon as possible. Suggested replacements are included in the Legacy banner on components in your flows. They are also given in release notes and SkillFlaw documentation whenever possible.
If you aren't sure how to replace a legacy component, Search for components by provider, service, or component name. The component may have been deprecated in favor of a completely new component, a similar component, or a new version of the same component in a different category.
If there is no obvious replacement, consider whether another component can be adapted to your use case. For example, many Core components provide generic functionality that can support multiple providers and use cases, such as the API Request component.
If neither of these options are viable, you could use the legacy component's code to create your own custom component, or start a discussion about the legacy component.
To discourage use of legacy components in new flows, these components are hidden by default. In the visual editor, you can click Component settings to toggle the Legacy filter.